Challah Bread Recipe

No nonsense, just the recipe. Here it is:

WilHomed

Makes 2 large loaves

Ingredients:
* 2 packets of dry yeast (instant is fine) or 4.5 teaspoons
* 2 C  warm water
* 1/4 C sugar
* 1/4 C vegetable oil
* 4 tsp salt
* 3 room temperature eggs slightly beaten
* 4 TBS honey (optional)
* 7 1/2 C flour
* Eggwash: 1 egg mixed with 1 tablespoon of water
* Poppy seeds (optional)

Directions:
* Whisk yeast and water well. Make it frothy.
* Add sugar, oil, salt and eggs and whisk well again. Make it frothy.
* Add 3 C of the flour and whisk well until there are no lumps. Here is where I add a bit of honey sometimes if I have some (about 4 TBS). Let the mixture rest for 5 minutes. It should bubble a bit.
* After the 5 minutes, gradually mix in the rest of the flour with a spatula.
* Drop mixture onto a dusted counter top and begin to knead dough for 10 minutes (I use this time to pray for the ones who will eat the bread. Traditionally, I do not think it is Challah bread unless it has been prayed over.)
* Dough may be sticky at first, but it should smooth up after a couple of minutes. If by 10 minutes it is still sticky, add a small amount of flour and knead a bit more. Same if it is crumbly, add very small amounts of water and knead a bit more.
* Form dough into a ball and let rise in large, oiled bowl for 1.5 hours. Cover bowl with clean towel and place in a warm area.
* Divide dough in half. Then divide each half into three equal parts. Roll out thick, long strands with each part and make into a braid. Tuck in ends.
* Let rise again for 45 minutes to an hour. Cover braided loaves with a clean towel.
* Brush with egg wash
* Sprinkle poppy seeds if you like
*Bake at 375 for 30-45 minutes

Some ideas:
* You can also not braid this bread and make small domes for an awesome soup bowl instead.
* When you divide the dough in half, you can freeze the other half in a ziplock bag then thaw and resume to next step at a later time.

Enjoy!

#bread #recipe #challah #love #fromscratch #homemade

Pumpkin Bread

Who doesn’t love new recipes to try out? Especially when it’s getting cool outside AND fall is just around the corner AND it’s a pumpkin recipe! Here is one I tried out on Monday and it was delicious. We devoured one loaf and gave the other away to a friend! The recipe is from “The New McCall’s Cook Book”. Here’s the recipe:

pumpkin bread

PUMPKIN LOAVES

Ingredients:
2 cups of unsifted all-purpose flour
1/2 teaspoon salt
1/2 teaspoon baking powder
1 teaspoon baking soda
1 teaspoon ground cloves (I only added 1/2 teaspoon)
1 teaspoon ground cinnamon
1 teaspoon ground nutmeg
2 cups sugar
3/4 cup of butter or regular margarine, softened
2 eggs
1 can (1lb) pumpkin puree

Directions:
1. Lightly grease two 9x5x3 inch loaf pans. Preheat oven to 325F.
2. Sift flour with salt, baking powder, soda, and spices; set aside.
3. In large bowl of electric mixer, at medium speed, beat sugar with butter just until blended. Add eggs, one at a time, beating well after each addition; continue beating until very light and fluffy. Beat in pumpkin. At low speed, beat in flour mixture until combined.
4. Turn batter into prepared pans, dividing evenly. (The batter is rather thick) Bake 1 hour and 15 minutes, or until cake tester inserted in center comes out clean.
5. Let cool in pans 10 minutes. Turn out onto wire racks to cool completely.

Makes 2 loaves


Mexican Rice – Recipe

After years of cooking this up, I think I got it just right. This rice is quick and doesn’t require chopping onions or garlic. If you want fresh ingredients, go right ahead, just put in a little less of the garlic and onion powder. If adding tomato, corn, or peas to this rice, you do not have to change the recipe, just add them after you add the spices. If you are going to use chicken stock instead of the bouillon,  add a little more of the spices.

Serves 8 as a hearty side dish

Ingredients:

2.5 scant cups of white rice (don’t fill all the way to the top)

2 Tablespoons of vegetable oil

8 oz. of Red Gold tomato sauce

5 cups of water

2 large cubes of Knorr bouillon

1 teaspoon of salt

1 teaspoon of dried diced onion (If using onion powder, use a very scant 1/4 teaspoon)

1/4 scant teaspoon of garlic powder.

1/8 scant teaspoon of black pepper

1/8 teaspoon dashes of paprika

Direction:

  1. Pour in the vegetable oil and saute uncooked rice until you begin to smell the nuttiness of the rice. Make sure your heat is on medium. You do not want the rice to burn. This is an important step because this does add taste to your rice and allows the rice to keep its texture better. This takes about 7 to 9 minutes. You will notice the rice turn from white to a cream color. Some grains of rice may turn brown, that’s okay
  2. After sauteing, turn down your heat to low and then pour in your tomato sauce. The tomato sauce will sizzle for a little while. Constantly stir for about 2 minutes allowing all the grains of rice to be cooked in the tomato sauce.
  3. Pour in your water one cup at a time and mixing in a little in between. Make sure you use the same measuring cup for the water that you used for measuring out your rice. Also make sure the water isn’t scant, but filled to the actual cup line.
  4. Break up your bouillon into smaller pieces and mix in.
  5. Add all the spices and mix.
  6. Bring your heat up to medium and heat rice to a low boil, cover and then lower the heat to low. Cook for about 20-25 minutes. Do not ever cook rice without a lid. Don’t constantly peek. The time may be different based on how hot your stove gets on these settings.
  7. After 20 minutes peek under the lid and when you see little vent holes around your rice, and the rice looks set, your rice is done. Uncover your rice and let it rest for a couple of minutes and then fluff with a fork.

Troubleshooting: If your rice is mushy, your rice measurings were too scant, just add a little more rice next time. If your rice is too hard, just add a little more water (about 2 Tablespoons at a time) and mix it in and cover again. Bring heat to low and cook for another 3 to 5 minutes.

Adjust spices according to your taste.

Some people add a couple of dashes of cumin to their rice, I don’t like it too much.

Mexican rice is flavorful and sometimes is just eaten on its own. If you have left over ground beef or chicken  you can mix it in. I love to eat my rice with leafy greens and a little bit of ranch on top. And just like beans, Mexican rice tastes better the next day.


Tamales

For years I have been wanting to make tamales for my family and friends, but every year I chicken out and just stare at the ingredients. I know now though why I hesitated so much. Making tamales is hard work and a long, messy process. But now that the dishes are finally clean, my counter tops and dining table don’t feel greasy anymore, and my friends are happy, it really is worth it – only once a year though.

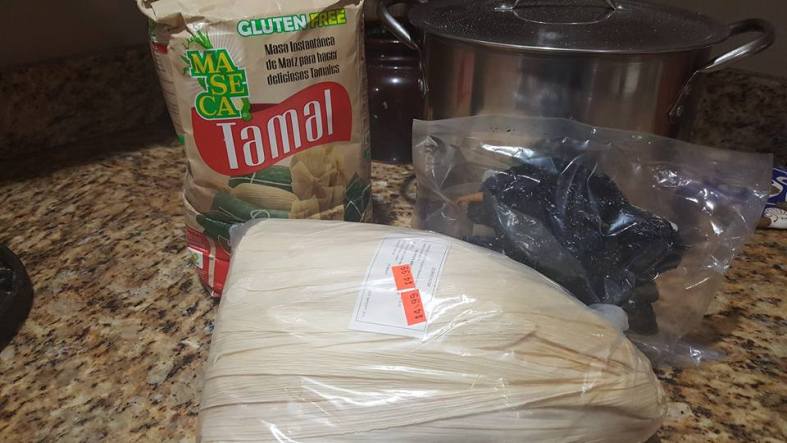
Living in a very small town in Western Kentucky I couldn’t find the special corn meal for the dough (masa) to make the outer part of the tamal, so I ordered it online on Amazon.  Here is the link for the masa mix I used. And on a trip to Atlanta I bought the corn husks. And on another trip to Louisville I bought the ancho chile for the sauce I made to cook my shredded chicken. Isn’t it fun to discover and explore?!

tamales

So again, I had everything I needed to make them, but this time I promised my friends I would be bringing them to their Super Bowl party – so I couldn’t back out like I had done so many times in the past.

I made the tamales on a Saturday when there was nothing much to do. My oldest was going to be out, my youngest had a new series of Pokemon she hadn’t watched, and hubby had a project he was going to work on. So after a big breakfast, I cleared the kitchen and began.

First, I took two large chicken breasts and boiled them. I added salt, pepper, onion powder, garlic powder, cumin and some bouillon to the water. This I used for my chicken stock.(1 pot dirtied)

After the breasts cooked, I took them out to cool (1 dish dirtied). After that I whipped about a cup of shortening for the dough with an electric mixer.(2 dishes total dirtied, 1 very greasy electric mixer) {YES! My mother yelled at me already so don’t tell me I should have used lard. I know! I actually thought I had some, and I did, but like 3 years ago when I originally had bought the tub of lard for tamales, but I never made them and threw the lard out last year I think! So instead of quitting – which I was about to do – I improvised and used shortening! Quit judging me!} After whipping the shortening, I then took another bowl (3 dishes now dirtied) and plunged the corn husk leaves in hot water to soften them. After that I used another bowl (yup that’s 4) to make the masa. I followed the instructions on the bag, but ended up using a little more chicken stock than what it called for.

molcajete

After making the masa, I placed the dough ball in the bowl with the whipped shortening and then mixed the two together using my hands! This was so greasy! It’s like mixing frosting with your hands!

shortening-masa

As I was mixing, I was looking for a consistency that was solid and wet enough to spread easily on the corn husks. I had to use some more of the chicken stock to get it just right. But here is where I think I made my mistake. I added some more bouillon (I use a paste) to the masa and mixed it in. I shouldn’t have. I wanted the tamales to be so tasty that I think I didn’t let the natural flavors just be. Although the tamales did taste fine, to me they tasted too “commercially”.

masa

After I achieved what I believed to be a good spreadable masa, I began to make the sauce for my chicken. (2nd pot dirtied). I placed 3 ancho chiles (I only used 1 though in the sauce though because I was afraid it would be too spicy), three roma tomatoes,  1/4 of a white onion, 2 garlic cloves, and salt into a pot and boiled them for about 10 minutes or until they were tender. I did remove all the seeds, tops and ridges from inside of the chiles before I boiled them.

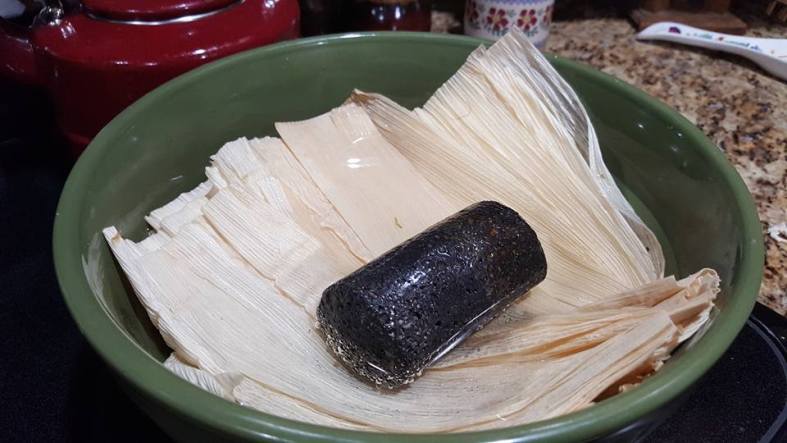
After they were boiled, I transferred all these ingredients to a blender and added salt, pepper, garlic powder, onion powder and cumin to taste. (1 dirtied blender) I also, at this time, removed the corn husk leaves from their water bath and spread them out onto a towel to dry out.

After the sauce was made, I took my chicken breasts and shredded them and placed them in a bowl (5th dish dirtied). I then added the sauce onto a cast iron pan with some vegetable oil to cook, (3rd pan dirtied)  and then added the chicken.

shredded-chicken

I had to add some more of my chicken stock to the salsa because it did thicken a bit.I cooked the chicken until it was softened and the smell was just wonderful!

chicken

After all of this was done I then began the assembling of the tamales. I placed the large bowl with the dough, the shredded chicken, the corn husk leaves, a large dish (6th one), and two spoons on my dining table. I asked my daughter if she would like to help me and she agreed and she loved helping me spread the dough onto the corn husk. I will warn you though that the dough is naturally greasy. My daughter got the dough all over the table, the floor and herself. Our dog probably ate about half a pound of raw masa from the floor. Where . . . is . . .  . he? Anyway, but these are times when I just couldn’t worry. I was passing a tradition down to my daughter daing it, and the dog dying from a heart attack wasn’t going to ruin this for us! We are making memories! So we assembled on.

Now, on the corn husk there is a very smooth side and a side that is bumpy or wrinkly. The dough is spread on the smooth side. After spreading the dough with the “grain”, using up about a third of the leaf, you then place some of the chicken filler in the middle and then fold the corn husk in half like a taco. After that you fold one more time and then bring the pointy end up to the thick end. If you can’t envision it, look it up on YouTube. My daughter was able to do it on her own around her third tamale.

We ended up making about 24 small to medium tamales.

After making them, I placed them in a stock pot (5th pot dirtied). But before putting the tamales in, I placed a steamer mesh and added water to the bottom of the stock pot. I then lined the bottom with corn husk leaves so that the actual tamales don’t get water in them.

tamales-3

After I added all our tamales and made sure they were all upright, I then placed more corn husks around the edges of the stock pot and then wrapped them up like a little baby.

tamales-2

I then placed a clean towel on top of that and put the stock pot’s lid on top. I steamed them on med-high heat for about an hour and 10 minutes.

At the end of the long wait, I pulled one out and unfolded it. The dough and the corn husk separated easily (which means they’re done) and I took a bite. They tasted good, but I think I over did it on the bouillon. Oh well. My family and I shared that one tamal and they all loved it. My daughter especially had a little proud face when we took them to the Super Bowl party and she found out that they all were gone quickly.

Now, Super Bowl was obviously on Sunday the next day so to reheat them I placed them flat in my cast iron skillet and toasted them a little on low heat to heat them through. This did make them taste better in my opinion because of the smoky flavor that is added by toasting the corn husks a bit.

Tamales are hard work, but it really was worth it. I now understand more why women in Mexico choose to make tamales with other women. It certainly is not something to be done alone. To converse, laugh and pass on the culture to our children is something easily entrusted through cuisine. In my opinion, it is something that currently is forgotten. With boxed dinners, microwaves, and fast food, we don’t have the time to sit with our children and just exist WITH them. Although most of us (me included) will not be making tamales all the time, we could make peanut butter and jelly sandwiches with our kids. They can help us make some hot chocolate or cookies. Let us teach them to create deliciousness in the kitchen.

When Elijah was down and tired of his life, God did something awesome to comfort him. He fed him. I will leave you with this verse:

And the LORD said, “Arise, eat, because the journey is too great for you . . . So he got up and ate and drank. Strengthened by that food . . . . . . he reached the mountain of God.  I Kings 19:7-8

Gorditas Recipe

“Gorditas” in Spanish means “little fat ladies” and “azucar” means “sugar”, so basically the name for these “cookies” is sugary little fat ladies. I had never made them before but they were a great after school snack for my crew yesterday and the husband finished them off. So total time they lasted was about 3 hours.

They are not too sweet and they are less chewy than a typical American cookie (making them perfect for dunking in hot chocolate!) These cookies are not baked in the oven but grilled on a skillet.

Some patience is required in grilling them because the skillet does need to be set to low. Any higher and you risk burning the cookie and having a raw middle.

Here is the recipe: (Makes about 15 medium sized cookies)
INGREDIENTS:
2 Cups of flour
1/2 Tablespoon of Baking Powder
1/2 teaspoon of Baking Soda
1/8 teaspoon of salt
1/4 Cup of butter (softened)
1/4 Cup of whipping cream
1/2 Cup of sugar
1 Egg at room temperature (I ran mine under warm water for a couple of minutes because I had forgotten to take it out)
1 teaspoon of vanilla

DIRECTIONS:
* In a medium bowl sift the flour, baking powder, baking soda and salt together. Set aside

* In a large bowl mix the butter and whipping cream for 2 minutes with a whisk. Then mix in the rest of the ingredients. You should have a smooth batter.

* Slowly add the flour mixture to your batter and mix with a spatula. Once it starts forming a soft dough use your hands to knead. The dough should be soft, if it is too hard, add some more whipping cream. If it is too soft add some more flour.

* Place your dough in a bowl and cover with some clear wrap. Let it “rest” for 30 minutes.

* Once you are ready to grill the cookies. Set your skillet on low. Take a spoonful of the dough, make it into a little ball and flatten using your hands. Then place it on the skillet. You can make these as wide as you like, but make sure the thickness is about half an inch. If you make them too thick you risk having a raw middle. Flip once  you see the bottom of the cookie begin to cook. Constantly flip until the outer edges are no longer doughy. (These cookies will rise as they are heated.)

*Wrap them in a clean kitchen towel to keep them warm.